Create a MOS CG Device Template
MOS CG Device templates are used to create MOS CG Master templates. These templates are then used to create MOS CG elements in NRCS rundowns to play on air when published to OverDrive. For each new MOS CG Device template, OverDrive automatically creates a MOS CG Master template associated with that device.
MOS CG Device templates are only created during commissioning of an OverDrive system. To create a MOS CG Device template after commissioning, please contact Ross Video Technical Support.
For More Information on...
•how MOS CG Templates are used to create MOS CG Shots in an NRCS rundown, refer to the section MOS CG Master Templates.
To create a Device template for a MOS character generator:
1.In TemplateEditor, click the Devices tab.
The Devices tab opens.
2.Click Add.
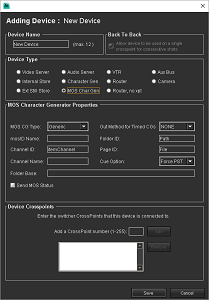
The New Device dialog box opens.
3.In the Device Name box enter a name for the new Device template.
Device template names can be up to 12 alphanumeric characters in length and must be unique within OverDrive.
4.In the Device Type section, select MOS Char Gen option.
The MOS Character Generator Properties section opens in the New Device dialog box.
5.Use the MOS CG Type list to select the type of MOS character generator used by the device.
The remaining settings in the MOS Character Generator Properties section that require values depend on the selected MOS character generator selected from this list.
Synergy switchers do not support the Inscriber XML MOS CG Type. Synergy SD switchers do not support the Inscriber MOS CG Type.
Inscriber® character generators higher than G3™ cannot be used with an OverDrive system that is connected to a Synergy SD switcher.
MOS CG devices that use the Pixel Power, Vertigo, or Maestro character generators collect the information used by the switcher to load an image from a MOS object in the NRCS.
RundownControl displays Pixel Power CG image information with the shot but editing this information does not change the image loaded by the switcher. To change the loaded image, use the NRCS to edit the image information in the MOS object associated with the shot.
6.For Inscriber XML MOS CG types, enter the identifier for the Inscriber render engine in the Render ID box.
7.For XPression MOS CG types, use the XPression Subtype list to select type of content to use from an XPression system. The available options are as follows:
•Graphics — on air graphics content.
•VS/AR - UX — virtual set content.
8.In the mosID Name box, enter the MOS ID assigned to the OverDrive Primary system by the NRCS.
9.In the Channel ID box, enter the channel identifier for the MOS character generator.
The default channel identifier is automatically entered in this box when Deko or Inscriber is selected from the MOS CG Type list. This setting is not required for the VizRT MOS character generator.
10.In the Channel Name box, enter the channel name for the MOS character generator.
11.In the Folder Base box, enter the full path to the folder that contains CG graphics.
For the Inscriber XML MOS CG type, this setting enables clip folder relocation when the Substitutable option is enabled on the Inscriber MOS Gateway.
12.Select the Send MOS Status check box to send the MOS status of the MOS character generator to OverDrive. OverDrive displays the MOS status of a MOS character generator in the CG Status column of RundownControl.
13.Select the Force re-cue when manually triggering Secondary Event CGs check box to force OverDrive to send an additional cue message to the MOS character generator before taking a graphic online when you manually trigger a secondary CG event.
Ross Video recommends selecting the Force re-cue when manually triggering Secondary Event CGs check box when mixing timed and manual CGs on the same channel. Clear this check box for older CG systems that do not ignore additional cue messages and where re-cues cause long delays.
14.Use the Out Method for Timed CGs list to select the default CG out method for the CG plugin. The available methods are as follows:
•NONE — manually take the online CG offline by clicking Take Offline in the CG Control view of RundownControl.
•ITEM — automatically take the online CG offline on the next OverDrive shot change. For example: a CG goes in at 0:01 on the voice over for “Local News”, and then goes offline when you advance to the next primary shot in the rundown (CAM1).
•STORY — automatically take the online CG offline on the next story change. NRCS rundowns use an Index Number or Slug Name to define story changes in the rundown. The OverDrive Rundown table Index column displays NRCS story index numbers. For example: a persistent lower third “Breaking News” CG goes online at 0:03 of the first camera shot story B01 and remains online during the following VO and TAG shots. When the story changes to B02, the GG goes offline.
15.In the Folder ID box, enter the tag identifier in the MOS message that contains the folder name.
The default tag identifier is automatically entered in this box when Deko, Inscriber, Inscriber XML, or Pixel Power is selected from the MOS CG Type list. This setting is not required for the other MOS character generators.
16.In the Page ID box, enter the tag identifier in the MOS message that contains the page number or object identifier name.
The default tag identifier is automatically entered in this box for the MOS character generator selected from the MOS CG Type list.
17.Use the Cue Option list to select one of the following options:
•Force PST — always load the CG clip to the CG PST Bus.
•Force PGM — always load the CG clip to the CG PGM Bus.
•Standard — load the clip to the CG PGM or CG PST BUS, dependent of on-air state.
18.In the Device Crosspoints section, enter a crosspoint number for the MOS character generator in the Add a Crosspoint Number box.
19.Click Add to associate the entered crosspoint with the MOS character generator.
The crosspoint is added to the MOS character generator crosspoint list. MOS character generators can only associate with a single crosspoint. If more than one crosspoint was selected for a MOS character generator, the MOS Device Crosspoint Selection dialog box opens when the Device template is saved. Use the list in the MOS Device Crosspoint Selection dialog box to choose the a single crosspoint for the MOS character generator.
20.Click OK to save the Device template for a MOS character generator and close the New Device dialog box.
The new Device template is added to the Devices list in TemplateEditor.